
Connecting a water heater switch is a crucial step in ensuring that your water heater is functioning properly. Water heater switches, also known as safety switches, are typically installed to control the flow of electricity to the heating element of an electric water heater.
If you’re planning on installing a water heater switch, it’s important to follow the correct steps to ensure that the installation is done safely and correctly, including proper ventilation to prevent overheating. Additionally, regularly checking and maintaining the switch is important for ensuring a steady supply of hot water in your household.
Here’s your how to connect water heater switch guide that’ll ensure an easy and safe installation.
When Would You Need to Install a Water Heater Switch?
Connecting the best water heater switch to the power supply requires proper wiring and safety precautions. For a 240V power supply, ensure correct grounding and use a 30 A circuit breaker with a #10 wire. If using a 120V power supply, opt for a 12-gauge wire according to the rating. Remember that only one live wire is needed to cut off the power supply through a single pole switch.
However, for added safety and control, it is recommended to use a double pole switch for electric water heaters, especially for those used in RVs. This type of switch ensures that both lines (hot or phase) are turned off, acting as a safety switch. It’s crucial to follow these guidelines, including proper earthing/grounding, to ensure the safe and efficient operation of your water heater.
Additionally, make sure to turn off the appropriate 30-amp circuit breaker in the breaker box before attempting to connect the AC water heater switch.
Connecting a water heater switch involves working with the electrical system in your home. It is essential to ensure safety and prevent electrical hazards when making these connections. Before starting the process, it is highly recommended to research legal requirements in your area regarding electrical work.
If you are unsure or uncomfortable working with electrical systems, it is best to hire a professional electrician to handle the installation. Properly connecting the water heater switch ensures efficient functionality and reduces the risk of electrical issues in your home.
- Replacing an old switch: If your water heater switch is old and no longer functioning properly, you may need to replace it. This is a relatively simple process that can be done with a few basic tools. You can find step-by-step instructions and videos on how to do this online.
- Installing a new water heater: When installing a new water heater, you will need to connect it to a switch. This is an important safety feature that allows you to turn off the water heater in case of an emergency. Again, you can find detailed instructions and videos on how to do this online.
- Manual control: Some people prefer to have manual control over their water heater. By installing a switch, you can turn your water heater on and off whenever you want. This can be useful if you want to conserve energy or if you are going on vacation and want to turn off your water heater while you are away.
Safety Precautions to Take Note Of
Understanding the NEC and IEC Guidelines
The National Electrical Code (NEC) and the International Electrotechnical Commission (IEC) provide guidelines that should be followed when connecting a water heater switch. These guidelines cover topics such as the proper wiring techniques, grounding requirements, and circuit breaker sizing. It is important to familiarize oneself with these guidelines before attempting to connect a water heater switch.
Proper Handling of Power and Ground Wire
When handling power and ground wires, it is important to ensure that the power is turned off at the circuit breaker. This will prevent any accidents or electrical shock while working on the wiring. Additionally, one should ensure that the wires are properly connected to the water heater switch and that the ground wire is properly connected to the grounding screw.
It is also important to note that the voltage of the water heater should be checked before connecting the switch. This can be done using a voltage tester. If the voltage is not within the proper range, then a professional plumber should be contacted to make the necessary adjustments.
In summary, when connecting a water heater switch, it is important to follow the guidelines set forth by the NEC and IEC. Proper handling of power and ground wires should also be observed, and the voltage of the water heater should be checked before connecting the switch. By taking these precautions, one can ensure a safe and successful installation.
To further understand the process of connecting a water heater switch, one can refer to this step-by-step guide and YouTube video.
How to Connect a Water Heater Switch
Preparing the Water Heater and Tools
Before connecting the water heater switch, it is important to prepare the water heater and tools. First, make sure the water heater is empty and the power is turned off. Then, remove the insulation from the water heater element and fill the tank with water. Next, gather the necessary tools, including wire cutters, wire strippers, pliers, a voltage tester, and plumbing tools such as a cutting plier and a piece of cloth. These tools will come in handy for the plumbing step in the installation process.
Wiring Diagrams and Step-by-Step Instructions
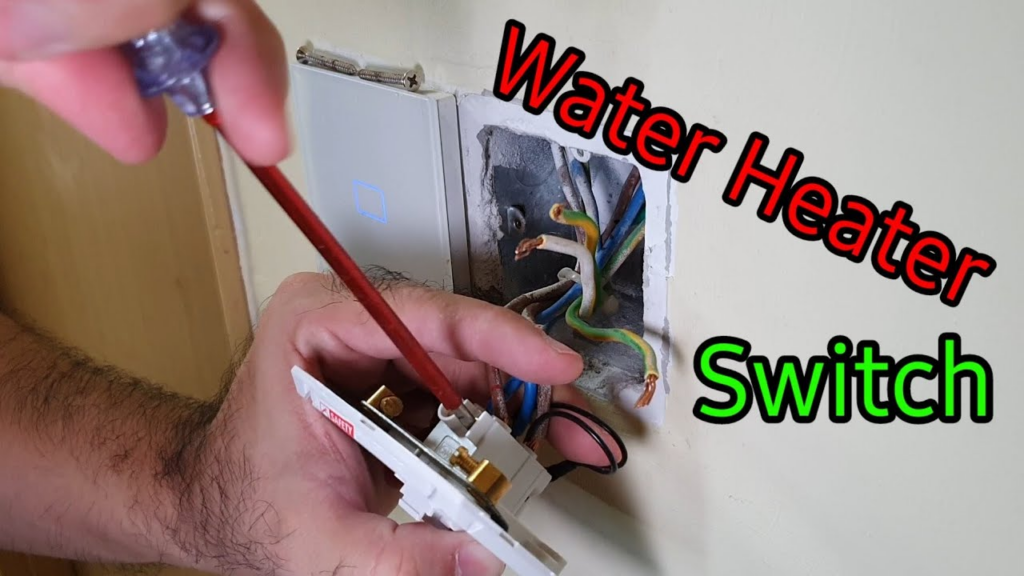
To connect the water heater switch, you will need to follow the wiring diagram for your specific model. Most water heaters have a hot wire that runs from the circuit breaker to the thermostat and heating elements. The thermostat controls the temperature of the water, and the heating elements, which are connected to the water heater through brass screws, heat the water.
To connect the switch, you will need to cut the hot wire and connect it to the switch. Then, connect the other end of the switch to the thermostat. Make sure to follow the wiring diagram and use the appropriate wire connectors.
Step-by-step instructions for connecting a water heater switch can be found in this YouTube video. The video provides a visual guide and helpful tips for connecting the switch.
Testing the Thermostat and Heating Elements
After connecting the switch, it is important to test the thermostat and heating elements to ensure they are working properly. Use a voltage tester to check the voltage at the thermostat and heating elements. If there is no voltage, double-check the wiring connections and the circuit breaker.
In conclusion, connecting a water heater switch is a simple process that can be done with some basic tools and knowledge of wiring diagrams. Follow the step-by-step guide and YouTube video provided in this section to connect your switch safely and effectively.